Generate PDF files from dynamic data
PDF files with dynamic data are essential for many applications, from generating invoices, certificates, and reports to creating personalized documents. In this blog post, we will explore how to generate PDF files from dynamic data using RenderForm.
PDF with dynamic data
A PDF file is a versatile document format that can contain text, images, and other elements. When we talk about generating PDFs with dynamic data, we mean creating PDF files that are populated with data from a database or other sources. This allows us to create personalized documents that can be tailored to the needs of each user. For example, we can generate invoices that include the customer's name, address, and order details. We can also create certificates that include the recipient's name and the course they completed.
Below we will show you how to generate certificates in PDF format using RenderForm. The process is simple and can be done in a few steps.
Step 1: Create a PDF template
To generate a PDF file, we first need to create a template. A template is a document that contains placeholders for the dynamic data we want to include in the final PDF.
In our case, we will create a certificate template where the dynamic data will be the recipient's name, the course name and the date of completion. Here is the template I created for the certificate in RenderForm:

Tips for creating a PDF template:
- Name the components in the template so you can easily identify them later.
- Choose the right size for your template. For example, if you are creating a certificate, you might want to use A4 or letter size.
- Use a clear and readable font.
- Use colors and images that match your brand.
- Make sure the template is well-structured and easy to read.
- Use a consistent layout and design throughout the template.
How to create a PDF template in RenderForm
Log in to your RenderForm account and go to the "My templates" section. Click on Create a new template and choose the size of the canvas you want to use. You can choose from A4, letter, or custom size (click on Show all to see all options).

You can adjust the size of the canvas later, directly in the template editor.
Once you have chosen the size, you can start designing your template. You can add text, images, and other elements to the template.
For dynamic data, simply name the components in the template to make it easier to identify them later. For example, in my certificate template, I named the components as follows:
- Recipient name:
full_name - Course name:
course_name - Date of completion:
date
Other elements in the template are static and do not need to be named. I lock them in the template editor to prevent them from being moved or deleted by mistake.

Make sure to give enough space for the dynamic data to fit in. For example, if you are using a long name, make sure the text box is wide enough to accommodate it.
Step 2: Choose PDF as the output format
Once you have created the template, you need to choose the output format. In this case, we want to generate a PDF file, so we need to select PDF as the output format.
Scroll down on the right side panel of the template editor and select PDF as the output format in Render Settings section. Save the template by clicking on the Save template button in the top left corner.

Step 3: Test the template
Now you can test your template to make sure everything is working correctly. To do this, click on the Preview button in the template editor and go to Live Preview.
There, enter the data you want to test in your dynamic data components. For example, in my certificate template, I entered the following data:
- Recipient name: Kinga Pomykała
- Course name: RenderForm for Beginners
- Date of completion: April 2nd 2025
Click on Render now to generate the template image with the dynamic data. You can see how the final PDF will look like with the data you entered. This is a great way to check if everything is working correctly before you start generating the PDF files.
Certificate template preview
Step 4: Generate PDF files
Once you have tested the template and everything is working correctly, you can generate PDF files with dynamic data. You can do this in several ways, depending on your needs.
There are a few ways to generate PDF files with dynamic data in RenderForm:
- Excel or CSV file: You can upload an Excel or CSV file with the data you want to generate the PDF files. The file can be uploaded in RenderForm's Spreadsheet plugin.
- API: You can use the RenderForm API and render endpoint to upload data to your template and generate the PDF files.
- Airtable: You can use the Airtable integration to upload data to your template.
Each method allows you to upload data to RenderForm and generate PDF files based on the template you created. Below you can find a detailed description of the Spreadsheet plugin method.
Spreadsheet plugin
The easiest way to generate PDF files with dynamic data is to use the Spreadsheet plugin in RenderForm. This method allows you to upload an Excel or CSV file with the data you want to generate the PDF files.
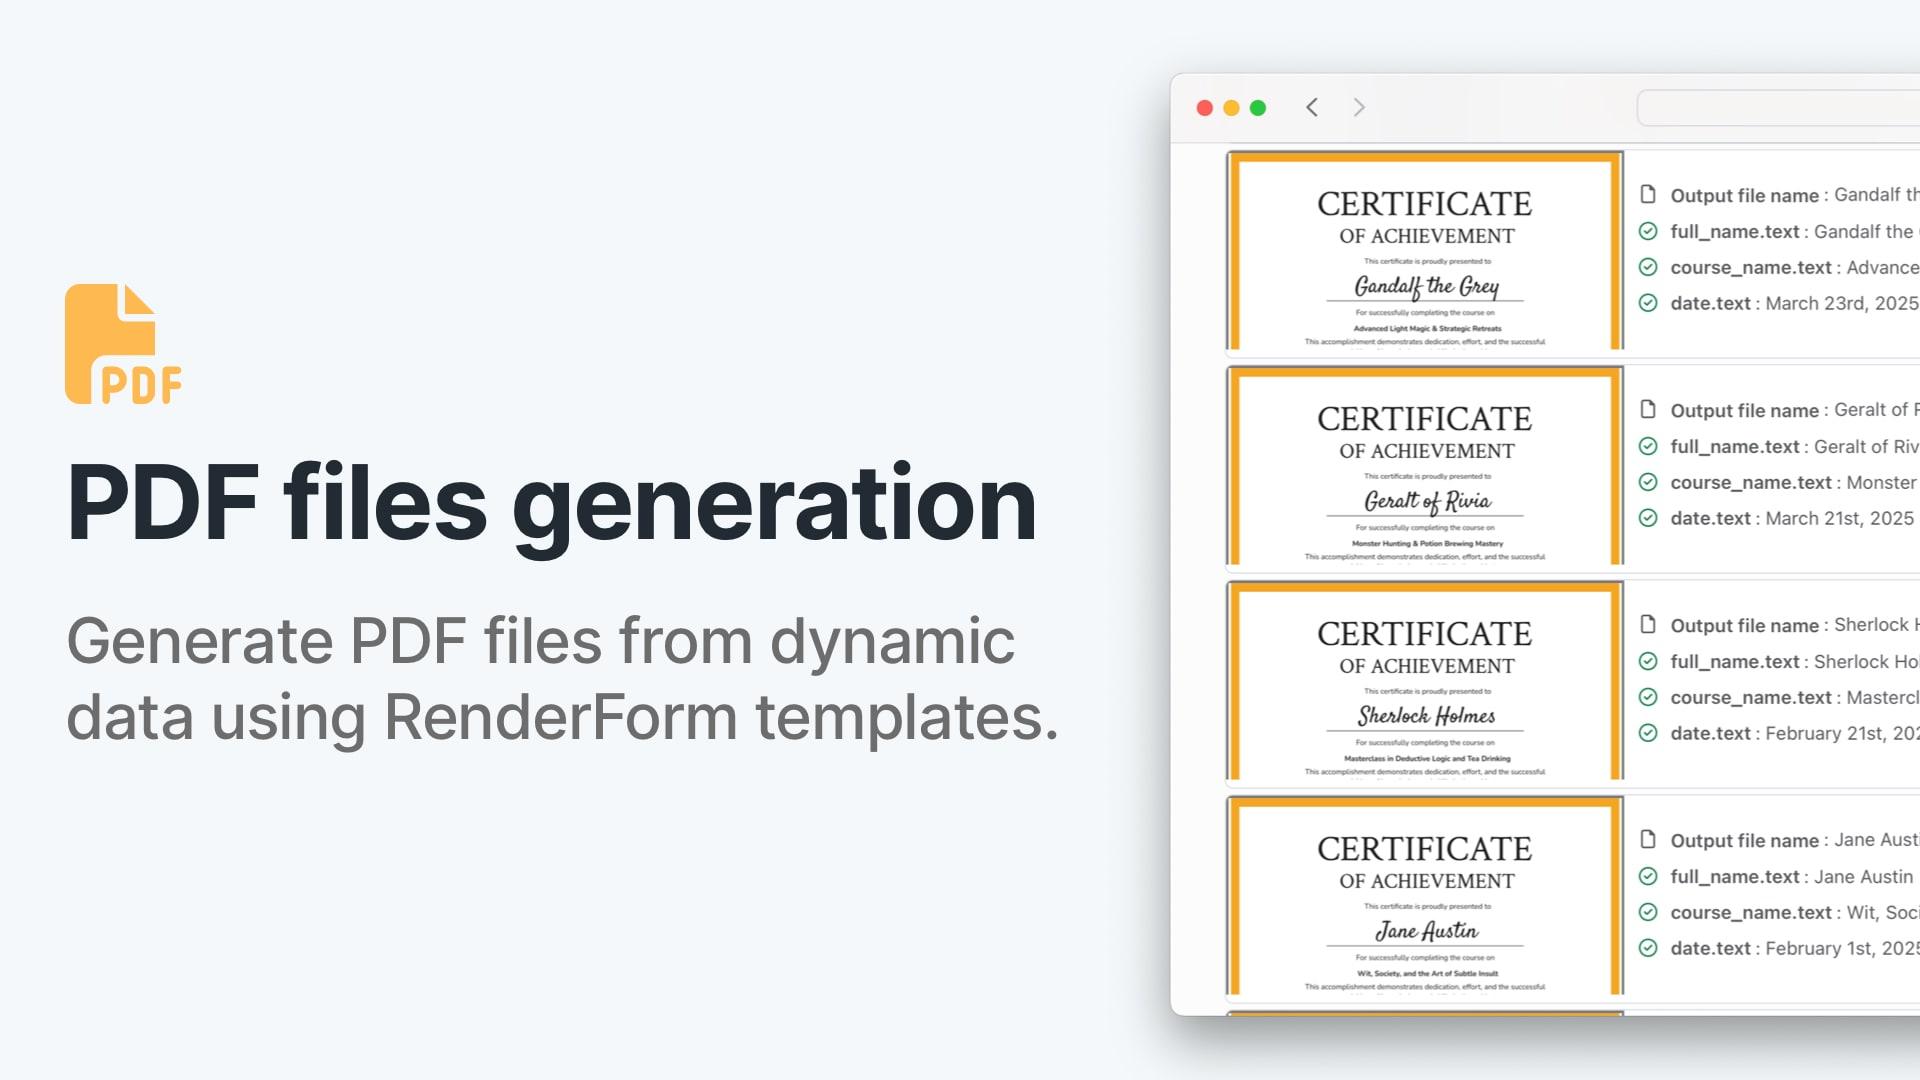
First, prepare the file with the data. The file should contain the same column names as the dynamic data components in your template. Note that the column name must include the component name and the property, separated by a dot. This is important because RenderForm uses this information to match the data in the file with the components in the template. For example, in my certificate template, I used the following column names:
full_name.textcourse_name.textdate.text
Here is an example of how the file should look like:
| full_name.text | course_name.text | date.text |
|---|---|---|
| Jane Smith | Python for Data Science | April 10th, 2025 |
| Spock | Logic-Driven Problem Solving for Teams | April 6th, 2025 |
| Kinga Pomykała | RenderForm for Beginners | April 2nd 2025 |
| Gandalf the Grey | Advanced Light Magic & Strategic Retreats | March 23rd, 2025 |
| Geralt of Rivia | Monster Hunting & Potion Brewing Mastery | March 21st, 2025 |
| Sherlock Holmes | Masterclass in Deductive Logic and Tea Drinking | February 21st, 2025 |
| Jane Austin | Wit, Society, and the Art of Subtle Insult | February 1st, 2025 |
| Jon Snow | Defending the North: Leadership Under Pressure | January 13th, 2025 |
You can also include
_fileNamecolumn to set the name of the generated PDF file.
Once you have prepared the file, go to the Spreadsheet plugin in RenderForm and upload the file. First, choose your template and click on the Import button. Selecting the data file from your computer.
Then, check if the data is correctly loaded in the data preview. If everything looks good, click on the Render button to start generating the PDF files. RenderForm will process the data and generate the PDF files based on the template you created which you can download using the Download button.
See the video below for a step-by-step guide on how to upload the file and generate the PDF files.
Generating PDF from spreadsheet
Conclusion
Generating PDF files with dynamic data is a powerful feature that can save you time and effort. With RenderForm, you can easily create templates, upload data, and generate PDF files in just a few steps. Whether you need to generate invoices, certificates, or reports, RenderForm has you covered.
In this blog post, we showed you how to create a PDF template, choose the output format, test the template, and generate PDF files using the Spreadsheet plugin. We hope you found this information helpful and that you will start using RenderForm to generate PDF files with dynamic data.
If you have any questions or need help, feel free to reach out to us. We are always here to help you.


